#
The Main Panel
The main panel consists of 4 tabs. Each tab is designed to accomplish a special range of tasks and setups.
#
Files
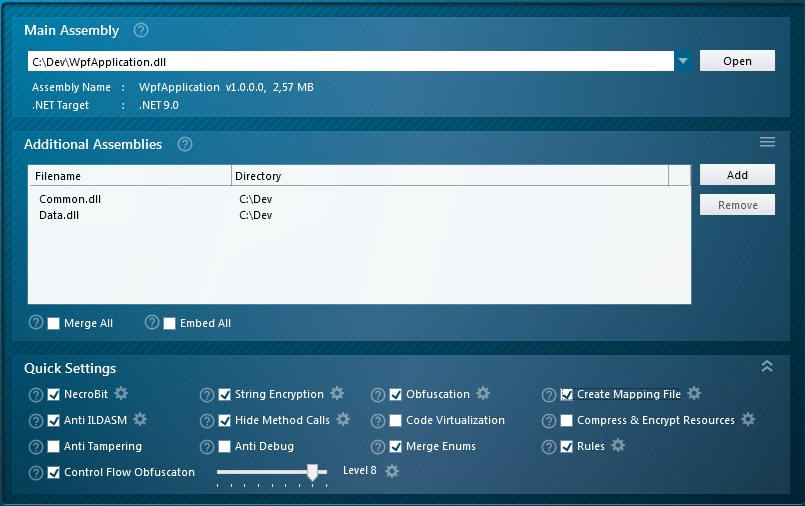
The Files page specifies the main assembly, additional assemblies and debug files, and general protection settings.
If you want to simultaneously protect more than one assembly or merge/pack assemblies, you must add the corresponding assemblies to this list.
#
Settings
#
General Settings
In the Settings page, the General Settings node enables compression, visual styles, target file location and display of a loading screen. The bottom panel gives you a description of the currently selected property.
- Application Settings
- Automatic Exception Handling - If you don't want your protected application to catch exceptions automatically, set this option to False.
- Compression - If set to True, .NET Reactor will compress a .exe file saving space on disk and bandwidth if you provide your code for internet download.
- Show Loading Screen - During the loading of a protected application, .NET Reactor can display a small "loading" screen.
- Dead Code Removal - This option removes code that will never be executed at runtime. As the size of your assemblies are reduced it improves performance and loading time.
- Digital Certificate - This node enables you to sign your protected assembly automatically with a digital code signing certificate.
- Embed / Merge Settings
- Advanced Settings - Advanced embed and merge settings for the additional files.
- Embed All Assemblies- If you embed assemblies they are stored as embedded resources in the main assembly. The embedded dependencies are directly loaded from memory at runtime and are not extracted to the hard drive.
- Merge All Assemblies - Enable this option to merge multiple assemblies into a single target assembly. Disable this option to protect all Additional Files separately.
- Merge Assembly Attributes - When this option is enabled, the assembly attributes of each input assembly are copied over into the final target assembly.
- Enable Visual Styles - If you wish to use visual styles, you need to set this option to True. If set to false, any attempt in your assembly to enable visual styles will be ineffective.
- Force Admin Privileges - If your software requires administrator privileges, you need to set this option to true.
- Strong Name Key Pair File -.NET Reactor automates the handling of strongly named assemblies. Select your key file and specify your password, and .NET Reactor does the rest.
- Project Targets Mono Framework - Enable this option if your assembly targets Mono. A less aggressive protection approach is used, which is compatible with the Mono Framework.
- Target File - .NET Reactor creates a new file containing your protected assembly. This field allows you to specify the path and name of that file. If left blank, .NET Reactor will write the new file to a default location.
#
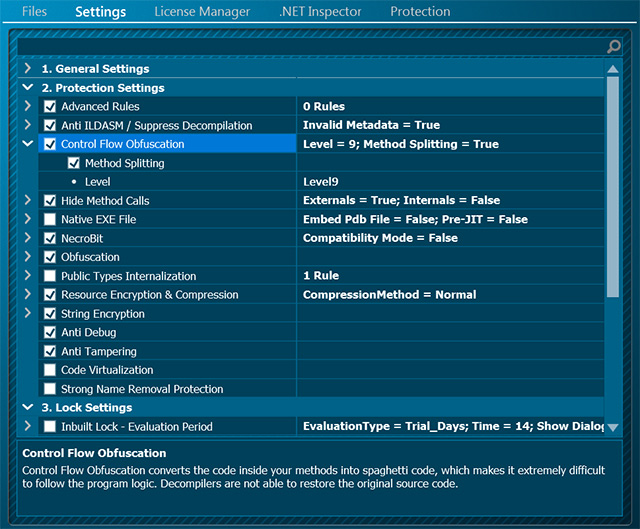
Protection Settings
The Protection Settings page allows you to enable a various of protection options.
- Anti Debug - Enable this option to detect the attachment of a debugger. In case a debugger is attached, the current process will be terminated.
- Anti ILDASM / Suppress Decompilation - Enable this option to suppress decompilation using decompilation tools.
- Anti Tampering - This option prevents your protected assembly from being tampered/modified by hacker tools. At runtime your protected assembly performs several binary integrity checks.
- Code Virtualization - Converts your code into a set of randomized instructions which are interpreted at runtime by a virtual machine.
- Control Flow Obfuscation - Control Flow Obfuscation converts the code inside your methods into spaghetti code. While retaining the function of the code, it is extremely difficult for human eyes and decompilers to follow the program logic. Decompilers cannot decompile the spaghetti code back to your original source code.
- Hide Method Calls - Enable this option to hide calls to external and internal methods. Method calls are redirected through delegates which are dynamically built at runtime.
- Native EXE File - .NET Reactor is able to generate a native x86 EXE file stub for your application. This way it is not possible to directly open your protected application in a decompiler. The decompiler recognizes your protected application as a native EXE file.
- NecroBit - NecroBit is a powerful protection technology that stops decompilation. NecroBit replaces the CIL code within methods with encrypted code. This way it is not possible to decompile/reverse engineer your method source code.
- Obfuscation - This node allows you to choose different exclusion schemes, create a Mapping file, enable general obfuscation of class, method, property and variable names, obfuscate public types, and use unprintable characters in obfuscated names.
- Create Mapping File - Enable Create Mapping File to create a file that cross-references unobfuscated names with obfuscated ones, which is used by the Stack Trace Deobfuscator.
- Enabled - Set to True to obfuscate all nonpublic class and member names.
- Exclusions - Various options to exclude classes and members from obfuscation.
- Generate Short Strings - Enable this option to generate short strings for your obfuscated class and member names.
- Ignore InternalsVisibleTo - Enable this option to ignore the InternalsVisibleTo assembly attribute.
- Inclusions - Options to enforce obfuscation for classes and members which are normally excluded from obfuscation.
- Incremental Obfuscation - If you want IntelliLock always to generate the same obfuscation strings for your type and member names, you need to enable this option.
- Merge Namespaces - Enable this option to place all obfuscated types inside a single namespace. This way you can prevent multiple obfuscated namespaces for DLLs used in development environments like Visual Studio.
- Naming Convention - Define how your assembly classes and members will be renamed. For most cases 'Stealth' is recommended. Read more...
- Obfuscate All Method Parameters - Enable this option to obfuscate all method parameters.
- Obfuscate Public Types - By default, only nonpublic types and members will be obfuscated. Enable this option to obfuscate all classes and members in an assembly. This option is only recommended for executable files(.exe).
- Pre-JIT Methods - In combination with the Native EXE File feature and NecroBit, .NET Reactor is able to convert small managed methods into REAL x86 native code. Only methods which don't affect the runtime and platform behavior (mostly small methods like property getters/setters...) are converted into native code. By nature this feature has built-in protection against assembly modification.
- Public Types Internalization - If set to True, .NET Reactor will convert all public types of an application into internal ones. This way the accessibility of classes and members is reduced.
- Resource Encryption & Compression - .NET Reactor can improve protection and assembly size by compressing and encrypting your managed resources. At runtime, when required the resources are automatically decompressed and decrypted.
- String Encryption - Enable this option to have .NET Reactor encrypt your string constants and variables. This encryption makes it much more difficult for a hacker to attempt a native code patch of your application, as he will be unable to identify the text of messages or other useful strings, making it much more difficult to locate where to patch your code. String Encryption disguises internalized text, making it all the more difficult to decipher the interaction of your CIL.
- Strong Name Removal Protection - Strong Name Removal Protection prevents your protected assembly from being tampered with by hacker tools as they cannot correctly resign the assembly with a different strong name. Warning, this option can impact the runtime performance of your protected assembly!
#
Lock Settings
Once you have protected your intellectual property from theft or unintended disclosure using the .NET Reactor protection options, the next step in maximizing your revenue stream is to ensure your full version application cannot be used without purchasing a license. This is where the feature-rich .NET Reactor licensing system comes in. Using a variety of "locks", .NET Reactor gives you the ability to control the use of your application in a variety of ways - trial versions, software rental, software as a service - all are possible using .NET Reactor locks, and all without any modifications to your source code. We recommend that you spend some time to understand these license enforcement options as the time you invest in doing so will be time well spent.
The Lock Settings node is where you specify the licensing controls you want .NET Reactor to build into your assembly when you protect it. These locks are implemented by additional code that .NET Reactor includes in the protected assembly and requires no changes to your application source code to implement. One of the powerful features of .NET Reactor licensing is that the settings you inbuilt into your assembly can be overridden by providing a license file to your customer, meaning you do not need to supply a separately licensed version of your program - the trial version and full version are the same, the only difference being the license file you provide to paying customers.
Note: These options are ignored for Compact Framework and Silverlight assemblies.
- Expire When All Expired
- When set to True, causes the expiration of the assembly only when all other enabled locks have expired.
- When set to False the assembly expires when any one of the locks expires. This is a very powerful option, enabling you to (for example) implement a trial period which is either 30 days or 50 uses. It is worth spending a little time considering this option's flexibility.
- Inbuilt Lock - Evaluation Period
The Evaluation period lock enables the creation of trial versions of your application, limiting the use of your trial in a variety of ways :- Dialog - Specifies whether a dialog box should be displayed to the user when the Evaluation Period expires and the message to display
- Enabled - set to true to display an evaluation period expired dialog box.
- Message - Enter the text of the message you would like to display to the user when the Evaluation Period expires. The message can be customized by .NET Reactor based on the evaluation settings by substituting various strings as follows :
- [current_minutes_days] is replaced by the current days since your application was installed (for evaluation type = Trial_Days) or the number of minutes the application has run for (for evaluation type = Runtime_Minutes)
- [max_minutes_days] is replaced by the value specified in the "Time" field
- Enable - Enables this lock.
- Evaluation Type - Allows you to specify two different types of trial versions :
- Trial_Days - your application will work for the specified number of days from the date of the first installation on a computer.
- Runtime_Minutes - The user can run the application an unlimited number of times, for an unlimited number of days, but the application will shut down each time it is run, after the specified number of minutes.
- Time - Specify the number of days or minutes for the evaluation period.
- Message - Evaluation period expired message.
- Dialog - Specifies whether a dialog box should be displayed to the user when the Evaluation Period expires and the message to display
Inbuilt lock - Expiration Date
The Expiration Date lock allows you to specify the exact date your application should expire. This is useful, for example for beta test versions and for software rental (where you can specify the expiration date as the day following the last date the customer has paid for the use of your software).- Dialog - Specifies whether a dialog box should be displayed to the user when the Expiration Date is reached, and the message to display
- Enabled - set to true to display an "expiration date reached" dialog box.
- Message - Enter the text of the message you would like to display to the user when the Expiration Date is reached.
- Enable - When set to true, this lock is enabled.
- Expiration Date - Specify the date upon which the application is to expire.
- Dialog - Specifies whether a dialog box should be displayed to the user when the Expiration Date is reached, and the message to display
Inbuilt Lock - Number of Uses
This lock, if enabled, causes your application to expire after the specified number of uses.Dialog - Specifies whether a dialog box should be displayed to the user when your application has been used the specified number of times, and the message to display
- Enabled - set to true to display a "number of uses exceeded" dialog box
- Message - Enter the text of the message you would like to display to the user when the number of uses has been exceeded. The message can be customized by .NET Reactor based on the evaluation settings by substituting various strings as follows :
- [current_uses] is replaced by the number of times the user has run your application
- [max_uses] is replaced by the value set in the "Uses" field for this lock.
Enable - Enable this lock.
Uses - Specify the number of times the user can run your application before it expires.
Max Number Of Instances
The max number of instances lock allows you to specify the maximum number of copies of your application the user is allowed to start simultaneously. Please note that exceeding the specified number of instances does NOT cause your application to expire.Dialog - Specifies whether a dialog box should be displayed to the user when they attempt to run more than the specified number of instances of your application, and the message to display
- Enabled - set to true to display a "number of instances exceeded" dialog box
- Message - Enter the text of the message you would like to display to the user when the number of instances has been exceeded. The message can be customized by .NET Reactor based on the evaluation settings by substituting various strings as follows :
- [max_processes] is replaced by the value set in the "Instances" field for this lock
Enabled - Enable this lock.
Instances - The maximum number of instances.
Nag Screen
We are all familiar with nag screens in applications, reminding us to purchase the product before the trial period expires. This option allows you to specify whether to display a nag screen to your user, again, without any modification to the source code of your assembly.- Enable - Enable the Nag Screen.
- Message - The text of the message to display on the nag screen.
- XDays - .NET Reactor can either display the nag screen every time the application is started (in which case set the value of this option to -1), or a specified number of days before the end of the Evaluation Period or Expiry Date. This is useful to allow the user a period to experience your application as if it were properly licensed, but then start to nag him as the end of the trial period or expiration date approaches.
Run Another Process After Expiration - Opens or launches another application, file, or website upon expiration. Usually used to send evaluation users to a web page.
Run Without License File - Set to false to require a valid license for operation. If true, enabled Inbuilt Locks are honored. If a valid license file is found, the Inbuilt Locks settings are overridden with the license file settings.
Shut Down Process After Expiration - Terminates your application upon expiration.
Static License FileName - Specifies a license file name or extension (*.myextension). Leave blank to allow .NET Reactor to determine a *.license file name from your assembly name. To avoid conflicts with optional methods of extending license behavior, binary .NET Reactor licenses do not use the .LIC extension reserved to .NET license classes.
#
Dialog Settings
Dialog Box Interface - .NET Reactor will display a default dialog box whenever a message is to be displayed to the user. However, you can design your own dialog box for .NET Reactor to display. Specify the fully qualified name (namespace.dialogname) of the dialog box .NET Reactor should use. Example C# and Visual Basic projects are in the SDK/Customisable MessageBox folder within the .NET Reactor installation folder.
Dialog Caption - Title for message window.
Gradient Color Begin - Gradient Color of the message windows.
Gradient Color End - Gradient Color of the message windows.
License Not Found - The text of the message which is issued when a license file is not found (if "Run Without License" is set to false), is found but is corrupt or otherwise invalid.
#
So many dialog boxes !
The number of possible dialog boxes may seem significant, and you may worry that your customer will see numerous dialog boxes when the locks expire. This is not the case, the .NET Reactor licensing system will only ever display one dialog to your user. .NET Reactor determines which is the most relevant dialog and displays that one only. The dialog box to display is determined as follows :
If "Run Without License File" is set to "True" and .NET Reactor cannot find the License file, or a License file is present (regardless of whether "Run Without License File" is true or false) and that License file is invalid, corrupt, not for the Hardware ID of the PC on which the application is run, or is invalid for some other reason, .NET Reactor will display the "Invalid License File" dialog;
If the application has expired, .NET Reactor will display the dialog box for the first lock, which triggered the expiry of the application in this order :
- Expiration Date
- Evaluation Expired
- The number of uses Exceeded
If the application has not expired, the Nag screen is enabled, and the XDAYS setting is such that the NAG screen should be displayed, then the NAG screen is displayed.
#
License Manager

The .NET Reactor license system allows you to distribute your assembly without a license file provided that you have set "Run without license file" to True. When your customer purchases a license, you use the License Manager to build a license file to unlock your application. Lock settings in a license file always override the inbuilt lock settings.
To create a valid license file, the same master key must be used for license creation as was used to protect your application. This master key is generated when you create your project, which must be saved to preserve the original key. Otherwise you will be unable to create valid license files.
The Evaluation, Expiration Date and Number of Uses Locks work precisely the same way as the inbuilt locks, except that the settings in the License file override the settings of the Inbuilt Locks.
The Individual Licensing Behaviour option is a particularly powerful feature of the .NET Reactor licensing system. If set to true, for the Evaluation Period and Number of Uses Locks, the specified number of days or uses are specific to the particular license file. For example, assume that your license file has the number of uses lock enabled and the number of uses set to 10. With "Individual License Behaviour" set to True, when you issue the first license to a user, he has 10 uses of the software available. If he then buys another license with the number of uses lock enabled and the number of uses set to 10, he has a further 10 uses (20 in total). If "Individual License Behaviour" were set to false, he would only have 10 uses in total (i.e. the 10 uses in the 2 license files are the same 10 uses). You must take care when issuing licenses with "Individual License Behaviour" set to true to understand that a user claiming to have lost his license file and requesting another will receive additional uses of your product. You should ensure you retain copies of issued license files so they can be re-issued to users who lose their licenses to prevent this.
License Files also introduce a new type of lock - the Hardware Lock. This allows you to create licenses that can be used only on a particular PC, based on a Hardware ID that identifies the particular combination of hardware in that PC. License Files which have the Hardware disabled can be used on any PC. Utilizing the Hardware Lock prevents your customer from purchasing one license file and using it on multiple PCs.
To create licenses that are locked to a particular PC's hardware, you must enable "Hardware Lock" and provide the Hardware ID of the client's PC. You can use the .NET Reactor SDK library License.dll to display the Hardware ID from within your application (for example in the "About" dialog box), or provide your customer with a program that will display the Hardware ID.
Additional information can be added to the license file at this time with the Add tool. Your application can access this information with the functions available in the SDK libraries.
#
.NET Inspector
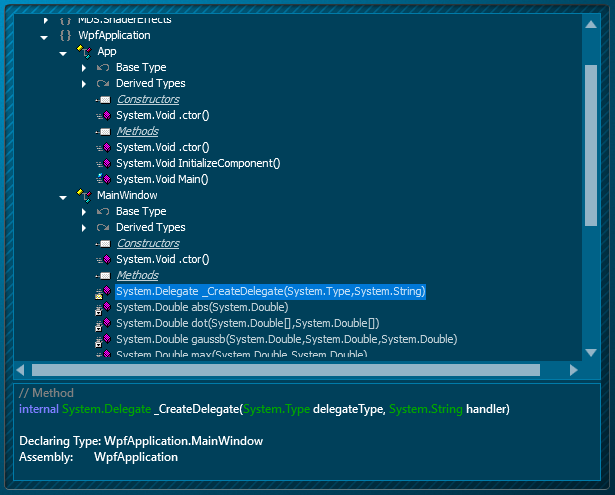
.NET Inspector reflects extractable information from the main assembly.