#
Build Integration Manager
The Build Integration Manager seamlessly integrates .NET Reactor into your build process. You can access it via the .NET Reactor main menu under Build/Development Tools → Build Integration Manager.
This manager can be opened in multiple ways:
- Main menu: Click Build/Development Tools → Build Integration Manager.
- Drag and drop: Drag project files from Visual Studio 2022 or Rider directly from the IDE onto the .NET Reactor main window. Additionally, dragging and dropping files via Windows Explorer or macOS Finder is supported.
- Rider and Visual Studio Add-ins: The add-ins also use the Build Integration Manager.
#
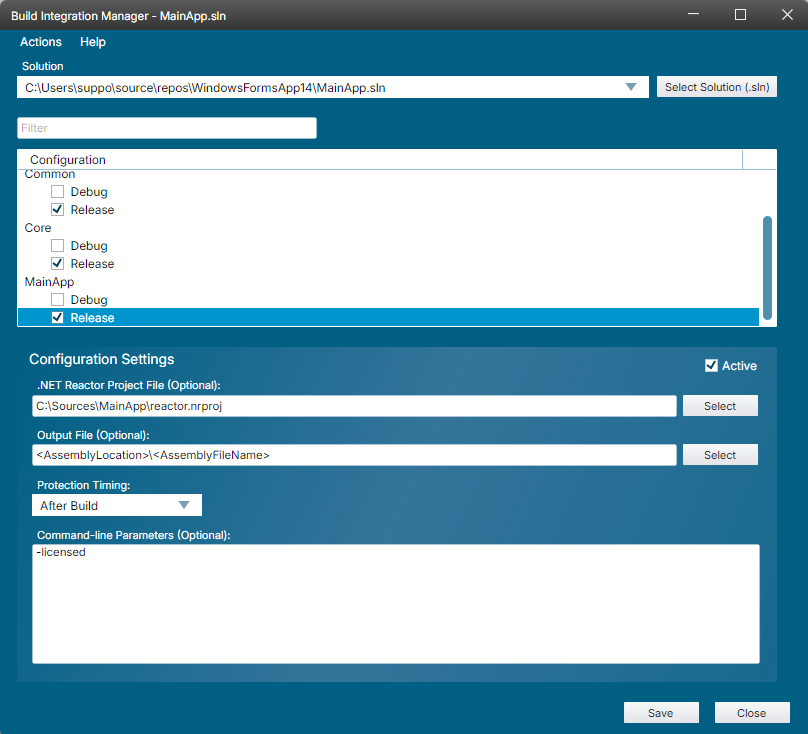
Selecting a Solution File
- Choose a solution (.sln) file in the manager. When using Drag and drop or Rider and Visual Studio Add-ins, the solution is automatically selected.
- The manager lists:
- All referenced projects in the solution.
- All available build configurations for each project (in alphabetical order).
Use the checkboxes next to each configuration to activate them for .NET Reactor protection. The project outputs of these activated configurations will be automatically protected when built.
#
Defining a .NET Reactor Project File
Within the Build Integration Manager, you can optionally specify a .NET Reactor project file:
- The protection and licensing settings of this project file will be used to protect the assemblies.
- You can also pass command-line parameters (see below) in addition to (or instead of) the project file.
#
Output File
The Output File field is optional. Its default value is: <AssemblyLocation>\<AssemblyFileName>
This means that the assemblies in the final output folder (e.g., bin\Debug or bin\Release) will be directly replaced with the protected versions. You can override this setting if you wish to store the protected files elsewhere.
#
Command-line Parameters
You can also provide command-line parameters that .NET Reactor will use in addition to (or instead of) a project file. You can combine them with an existing .NET Reactor project file for more granular control.
When using a full version of .NET Reactor, it is recommended that you add the -licensed parameter. If this parameter is provided while running a demo version, the build will fail with error code 101 — preventing accidental protection with the demo version (which would cause your software to stop working after 2 weeks).
#
Protection Timing
This is a critical setting that determines when .NET Reactor will protect your assemblies during the build process. The following options are available:
After Build (default)
.NET Reactor protects the assembly after it is copied into the final output directory (usuallybin\Debugorbin\Release). This is the standard approach for most projects.After Compile
.NET Reactor protects the assembly earlier, when the files are still in theobjfolder, before they are copied to the final folder.- This is useful for deployment or publishing processes (e.g., setup projects, MAUI apps) that take the assemblies from the
objfolder instead of the final output folder. - If your installers or publishing processes are not including the protected files, switching to After Compiler should resolve the issue.
- This is useful for deployment or publishing processes (e.g., setup projects, MAUI apps) that take the assemblies from the
After Publish
.NET Reactor protects the assembly after the project is published. There is no widely known practical use case, but it's available if you need an even later protection step.
#
Project File Modifications
To integrate .NET Reactor into the build, the corresponding project files (e.g., .csproj, .vbproj) are updated. Furthermore a new file ending with .dotnet_reactor.targets is added.
#
Build Environments
Projects modified by the Build Integration Manager will work automatically on Windows and macOS if:
- .NET Reactor is installed via its installer, or
- You use the .NET Reactor Azure DevOps Pipelines Task, or
- You use the .NET Reactor GitHub Action.
#
Other Build Environments
If you are building in other environments, you need to set the environment variable DOTNETREACTORROOT (or DOTNET_REACTOR, both are recognized) to the directory containing the .NET Reactor binaries. This ensures the MSBuild targets can locate and execute .NET Reactor properly.
#
Actions Menu
When working with many projects and configurations, the Actions menu can help you quickly configure multiple items at once. The available actions are:
Selected Configuration → Copy Settings
Copies the current configuration’s settings (e.g., project file path, output file location, command-line parameters, etc.).Copied Settings → Selected Configurations
Applies the copied settings to all currently selected configurations.Copied Settings → All Active Configurations
Applies the copied settings to every configuration that is activated (checked).Copied Settings → All Debug Configurations
Applies the copied settings to all Debug configurations in the list.Copied Settings → All Release Configurations
Applies the copied settings to all Release configurations in the list.
This can be a significant time-saver if you need to update protection settings across multiple projects.
#
Filter Textbox
To help locate relevant configurations among many projects, the Filter textbox allows you to quickly search and display only the matching configurations. This is especially helpful for large solutions with numerous projects and build configurations.
#
.hash Files
Sometimes, .NET Reactor creates files with the .hash extension. These files are used internally by .NET Reactor to determine whether a file has already been protected. You do not need to ship them with your application; therefore, you can safely ignore them.
#
Summary
The Build Integration Manager streamlines the process of protecting your assemblies with .NET Reactor by injecting protection steps into your build workflow. By configuring the Solution File, .NET Reactor Project File, Output File, Command-line Parameters, and Protection Timing, you can tailor the protection process to fit various build and deployment scenarios. With the Actions Menu and Filter feature, managing large numbers of projects and configurations becomes efficient and straightforward.
Note: Always ensure you are using a licensed version of .NET Reactor for production builds (or use the -licensed parameter) to avoid accidental demo limitations.