

#
Deployment and First-run Setup
#
IIS configuration
Create an IIS application instead of serving the files as an unconfigured directory.
IIS is the Windows web-server feature. An application pool is the Windows process that runs the website. If these terms are unfamiliar, give the following table to your hosting provider or server administrator.
The application must be able to create and replace files in App_Data. In IIS,
grant Modify permission to the identity used by the website's application
pool.
Read-only deployment storage, temporary container filesystems and simultaneous
use by several web instances are not supported by the bundled SQLite design.
In IIS Manager, add the generated folder as an application and select the dedicated application pool. The Microsoft example below shows where the application pool and physical folder are selected. The dialog appearance can differ between Windows Server versions; use the values from the table above, not the example names and paths in the picture.
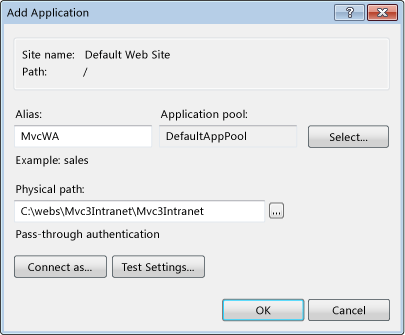
Image source: Microsoft Learn — How to Create an Intranet Site Using ASP.NET MVC.
#
Remote setup protection
The IntelliLock desktop workflow prepares App_Data\IntelliLockSetup.token and
shows its one-time value. This is the code that you enter on the first setup
page. A manually copied package does not contain a reusable default code.
The normal and recommended method is License Server > Create License Server Website in IntelliLock. Manual token creation is an advanced deployment option. The token file and matching code are always required, including when setup is opened directly on the IIS server. The token is deleted after successful setup.
#
Passwords
Setup uses two independent passwords:
- The administrator password authenticates the first management account. It is stored only as a salted, peppered password hash. Twelve or more characters are recommended, but setup does not enforce a specific password policy.
- The database password encrypts the SQLite database and integration secrets. It must contain at least 12 characters. Keep it separately from the website backup because it is required for recovery and server migration.
Neither password is written to web.config. There is no password-recovery
backdoor.
#
Protection modes
#
Bind securely to this Windows server (recommended)
This mode ties the saved database credentials to the current Windows server. A copied settings file is not enough to open the database on another server.
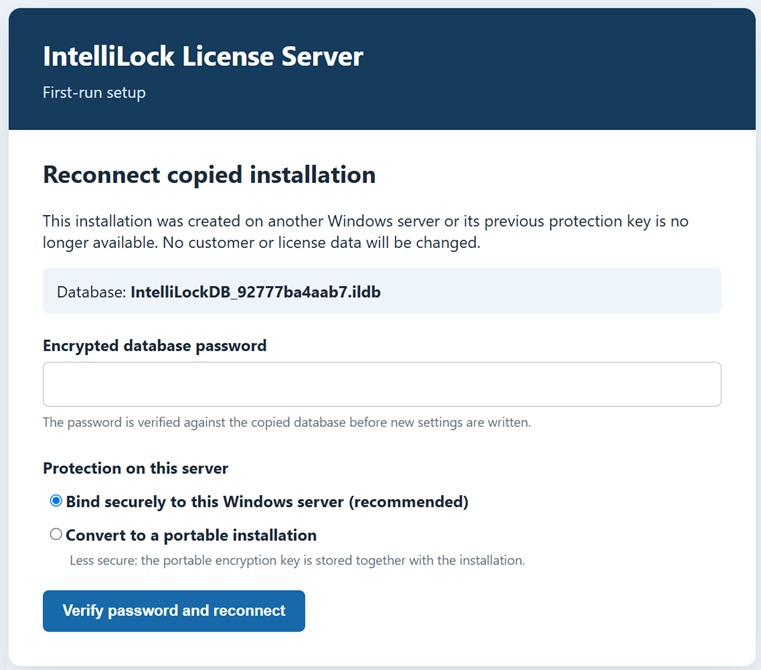
If you later move the complete website, the new server shows Reconnect copied installation. Enter the database password once. The website checks it before it saves a new server binding.
#
Portable installation
Portable mode is easier to copy between changing cloud or hosting machines. Its
key is stored in App_Data beside the protected data. For this reason it gives
less protection when somebody steals the complete folder. Use it only when the
server-bound mode does not fit the hosting environment.
The reconnect page can retain server binding or convert the moved installation to portable mode. A wrong database password is rejected without changing the installation.
#
Files created in App_Data
Never delete or modify the pepper file. Existing management password hashes
cannot be verified without it. Back up the complete App_Data directory, not
individual generated files.
#
HTTPS behavior
Setup deliberately shows a warning instead of blocking HTTP so a new or moved
site can be recovered before TLS is ready. After HTTPS works, set
Security.RequireHttpsForManagement=true in web.config. Plain-HTTP login and
management requests then receive HTTP 403.
Behind a TLS-terminating reverse proxy, add only the proxy's exact address or
network to RateLimit.TrustedProxies. Configure the proxy to replace forwarded
headers rather than accepting client-supplied values.
#
Setup completion
Successful setup creates an empty current-schema database, the first full administrator, the installation pepper and a private project copy. It does not create sample customers, products, licenses or sales. The setup page is locked after completion.
Next, sign in and follow License Server Quick Start.